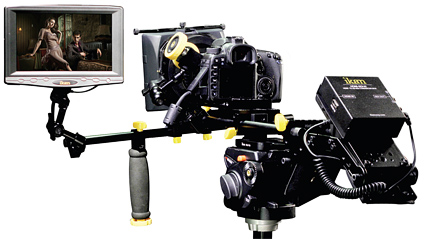
Ikan VL7 HD Monitor, Viewfinder

Ikan’s VL7 HD monitor/viewfinder
Nothing beats a compact high-resolution field monitor for improving focus, color balance, and framing. This is particularly true when shooting HD in low light conditions, which makes accurate focusing a challenge, whether you're using a conventional camcorder or a DSLR. Experience has shown that an HDMI port is essential in obtaining the sharpest image possible. Thanks partly to the popularity of DSLRs for pro video work there's a growing number of monitors for such applications, but few are priced at less than $500. One of those that does fall into this price range is Ikan's new VL7, which the company describes as an "entry level" high quality, HD monitor.
FEATURES
The VL7 is compact, with dimensions of 7.5 x 5.25 x 1.03-inches. It tips the scales at barely one pound (without battery) and sports an HDMI port, two composite inputs (both miniplug, but there are RCA adapter cables included). This flat-screen LCD monitor has a resolution of 800 x 480, and features a peaking function for more accurate focusing, even in daylight. It also quickly switches between 16:9 and 4:3 aspect ratios. Current draw is minimal, and the monitor can be powered by any of several 7.2 V prosumer camcorder batteries by using Ikan's BP2T DV universal battery plate (included with the monitor package). The use of camcorder-sized batteries helps keeps things light and easy to mount for use on a DSLR, even without a special rig. Being able to use the same batteries that your camcorder uses means one less charger to carry and helps keep your travel case uncluttered. My Ikan kit came with a heavy-duty Sony battery with enough capacity for several hours of continuous use.
Monitor mounting is achieved via a three-inch post, with a swiveling ball and socket head. This all snugs into a standard camera shoe with a locking washer. The mount's swivel head can be locked securely at various angles with a large, easily grasped thumbscrew. The monitor is firmly fastened to the swivel head with the help of a locking washer. The kit also includes a charger, AC adapter, shoe mount, and durable hard foam-lined aluminum case. (An HDMI cable is not part of the kit.)
IN USE
As the VL7 comes with everything you'd need for use with a DSLR (except the HDMI cable), you'll need your own such cable—preferably one that's three feet or less in length, as the distance between the camera's HDMI port and that of the monitor will be less than this, even with the VL7 mounted atop a handle on your DSLR rig. However, if you have your DSLR's RCA adapter cable, you can connect via one of the two monitor ports by using the pair of adapter cables provided with the VL7.
I started out by mounting the post/ball and socket head directly on my Canon 7D's accessory shoe so that the VL7 would align directly above the camera lens and the 7D's LCD screen. This is my personal preference, as it allows me to track moving targets more easily. I used an HDMI feed and when I first powered things up, got a blue screen with "AV1" displayed in the upper right corner. I used the input switch on the monitor's control panel to select HDMI and then had a live image of the room as seen by the 7D and its ultra-wide lens. (AV1 seems to be the monitor's default setting.)
One of the first things I noticed was that the letterboxed 16: 9 image filled less than half of the screen area, while the 4:3 default image area barely exceeded that half-screen fill. Nevertheless, image quality was quite good. I did notice, however, that the color seemed a bit skewed at first glance. Unfortunately, I found no standard hue or "tone" colorimetry options in the menu, per se. I was finally able to achieve fairly natural image color by dialing down the saturation level from the monitor's default level of 50 to 35. I also reduced contrast and brightness and uprezzed the sharpness to achieve a fairly realistic live view—in indirect sunlight. However, I noticed that the color shifted whenever I selected a different pre-set white balance setting in the 7D's menu. I found myself using the 7D's LCD screen for reference whenever changing the white balance settings in its menu. Toggling between the two screens simply entailed switching from HDMI to one of the AV input settings on the VL7. Switching from 16:9 to 4:3 can also be done at the push of a button on the VL7 control panel—in this case via the "F" (function) switch on the right side of the control panel. The other two function options are underscan and peaking. These days, I have little use for 4:3 displays or underscan, so I mainly used the function control to toggle between normal and peaked displays. Video peaking is very helpful for accurate focusing in both bright and low light situations. However, I found the contrasty black and white look of the peaking display distracting, so I only used it to check focus, preferring to stay with the normal display most of the time.
Adjusting display quality by tweaking contrast, brightness or saturation was easy and fast, via the menu button and the "plus/minus" switches. All of the adjustments can be viewed on the screen and take place in real time.
In practice, colorimetry, contrast, brightness and other attributes of the displayed image on the VL7 are of secondary importance to DSLR users. (This is, of course, assumes that you have correctly white balanced the camera.) The monitor's prime value is in accurate focusing, and also for framing eye-teasing shots, particularly those shot at low camera angles. The monitor is also great when you're using an ultra-wide zoom lens for tracking shots, or in rapid-fire situations demanding fast focus and accurate framing. What this economical monitor/viewfinder lacks in durability, sharpness and snob appeal is made up for in convenience of use and versatility.
By using the VL7 as a large adjustable viewfinder, I was able to capture an "Alice in Wonderland" perspective both indoors and outside, including many shots at point blank range and in low light conditions. By tilting the VL7 forward on the ball and socket, I got phenomenal wide-angle tracking shots, which compared with the "flyover" shots obtained with a Steadicam rig.
Moreover, the ergonomics of being able to look down at the camera at a 90 degree angle relative to the lens makes it feasible to tilt the lens upwards at unusual low angles, providing an arresting dog's eye view or even parrot's eye view (pick your critter) of the world. The monitor and its mounting allow you to frame the world through an assortment of different perspectives, while keeping things in focus all the while.
SUMMARY
Naturally this less than $300 monitor has its limitations—notably sharpness (resolution is only 800 x 480). However, it is sharp enough to improve your focusing accuracy, whether you're shooting with a tripod, handheld rig, or some other platform. The monitor's limited color adjustment range also reduces its utility in gauging the true image color being captured, but it can certainly verify whether color balance is correct or not.
Image wise, it's perfectly adequate for use as a viewfinder and confidence monitor, but should not be considered as a primary definitive HD display.
Also, its lightweight construction could make it more vulnerable to break in professional use.
Regardless, the bottom line is that the VL7 allowed me to fully tap the potential of the ultra-wide 10-24 mm lens I used. It provided me with a tool for achieving perfect focus, and also for perfect framing at camera angles that would otherwise make such framing impossible without extreme difficulty and a great expenditure of time.
Ikan's VL7 monitor makes a cost-effective and convenient HD viewfinder for use with DSLRs or HDMI-equipped camcorders. While there are better monitors around, few, if any, provide as much bang for the buck. This monitor package is truly a bargain for the price.
Carl Mrozek operates Eagle Eye Media, based in Buffalo, N.Y., which specializes in wildlife and outdoor subjects. His work regularly appears on the Discovery Channel, The Weather Channel, CBS, PBS and other networks. Contact him at eagleye11@gmail.com.

The professional video industry's #1 source for news, trends and product and tech information. Sign up below.
