Using Hard and Soft Lighting When Shooting in 4K
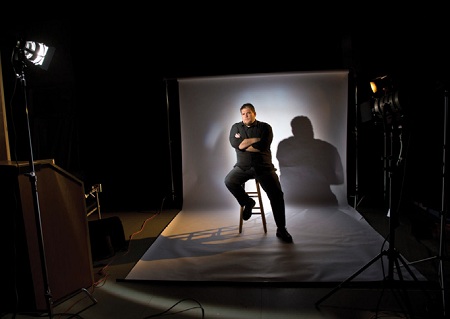
Fig. 1 illustrates the positioning of the lights within the environment.
ALLENTOWN, PA.—High-definition acquisition has added so much to the quality of video; every nuance in the talent’s face is easily seen. With the advent of 4K, appropriate lighting is even more important as less is held to the imagination.
On a recent project shooting in 4K with my students, I wanted the two opposing characters to be as different as possible especially with the lighting. The male lead will always be seen in very hard lighting. Every crevasse and line in his face would help the audience relate to his character, while the female lead would be the opposite.
BEST POSITION
Hard lighting is best created from a strong source, in my case a K5600 Joker Bug 200 Watt HMI. Although an extremely powerful light, the HMI’s beams were slightly diffused with its frosted glass lens. At a distance of 10 feet from the talent and pointed slightly camera left, this key source provided 650 foot-candles of illumination. If the light were positioned directly in front of his face, the lighting would still be hard, but too flat. Angling the key slightly to camera left, it provided modeling but the harshness of it still prevailed. When the length of the nose shadow reached the correct length, the light was in the best position.

Fig. 2 best illustrates the look I was after. The key light is obviously only part of the story. Still desiring separation from the background, a strong backlight was also necessary, in this case, a Mole-Richardson 750 Watt Tweenie. Because the Tweenie is tungsten balanced, and the talent has darker hair, a full color temperature blue gel corrected the tungsten light to daylight and also enhanced the hue of his hair. The first image (Fig. 1), illustrates the positioning of the lights within the environment. Because I wanted the hard light to be very directional (sunlight coming in through the window), I had no fill light. The ambient light from the wall opposite the talent added enough subtle fill, but still gave the key light the directionality I wanted.
The image of the final result (Fig. 2), best illustrates the look I was after. Shooting with the Canon C500 in its uncompressed RAW mode takes up an enormous amount of drive space, but allows many options in editing. When shooting in 4K or HD, it is best to light your scene shows the detail you require. Shadow areas are no longer muddy, pixilated areas are within the frame. There is now great detail as cameras can shoot with less light at higher ISOs.
COLOR TEMPERATURE
Color temperature also plays an important role in lighting specifics. The male lead used daylight-balanced illumination and I adjusted the color temperature slightly blue at 4950º K. Again, shooting in uncompressed RAW allows changes in color temperature as late as the post process.
The professional video industry's #1 source for news, trends and product and tech information. Sign up below.
Contrasting the male lead with the female, in all of her lighting requirements we utilized the softest light available. Since we wanted her to almost glow like the glamour shots of the 40’s, her lighting needed to be completely different than the male lead.
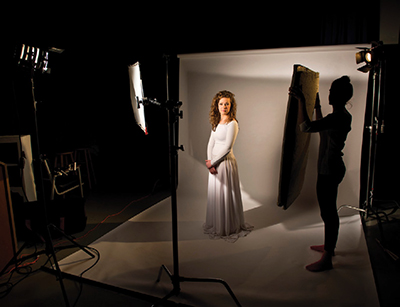
Fig. 3: The first image of the female talent illustrates the lighting setup. Using the same Tweenie as the key source—placing it slightly to the left or right depended on the practical source in the scene—was only part of the effect. Using a large piece of diffusion (Rosco 216) extremely close to the talent would create the soft look I was after and also enlarged the area of soft light. Although the light is placed much closer to directly in front of the talent, a piece of white foam core always acted as the fill. The first image of the female talent illustrates the lighting setup (Fig. 3).
The closer the diffusion material is placed to the subject, the softer and broader the soft light appears to be. A light source like fluorescents, LEDs, or even a softlight itself may also be used as a soft source; but the softest look only comes from placing the diffusion material closer to the subject and farther from the light source itself. This helps “spread out” the light’s beam seemingly making it a larger source of illumination.
Using a tungsten source in this instance, I also used a Mole Richardson 200 Watt Inky as a backlight. Some might think that using color temperature orange on a tungsten light is overkill. If your talent has light colored hair (blonde in this case), using a full CTO gel on her hair actually makes it appear lighter (more blonde?) and radiate more light. The backlight was essential in achieving this glowing look.
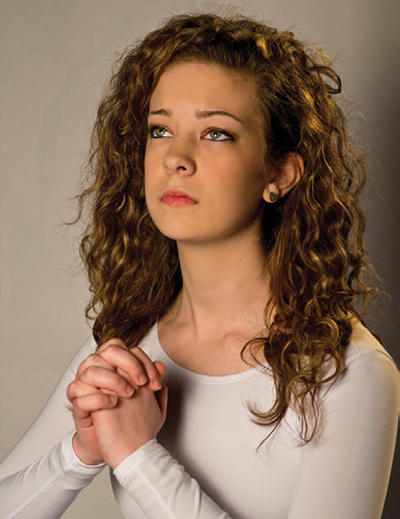
Fig. 4: The talent’s white dress helped create the mood by reflecting the light and overexposing slightly. This is the end result.
The color temperature, although normally 3200ºK, was raised slightly to 3450ºK to further enhance the warmth of the scene. Her white dress also helped create the mood by reflecting the light and overexposing slightly. The end result is seen in the last photo (Fig. 4).
All of these nuances work well in still photography, HD video, and even more so in 4K. It does not matter in what format the end result may be viewed; properly exposing the footage and knowing how to best place and utilize your lighting will make all the difference. And that’s a nice reflection on you.
Chuck Gloman is Chair and Associate Professor of the TV/Film Department at DeSales University. He may be reached chuck.gloman@desales.edu.
Chuck Gloman is Associate Professor with the TV/Film Department at DeSales University.

