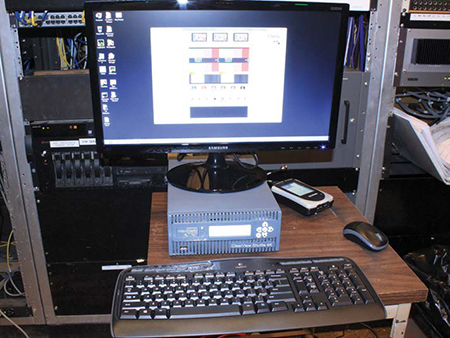
The Video Clarity ClearView Shuttle 4K under test at the author’s television station
A couple of decades ago—before the development of file based workflow—the Holy Grail for broadcasters was being able to dub content with no degradation. Finally this came about with file-based workflows. Never ever would anyone have any woes again when it came to editing, dubbing, moving, or distributing audio/video content. That lasted for maybe a week. Then, all of a sudden, there was more than one player with more than one idea as to how to create those files and here we are with another set of issues.
For solving those modern issues associated with encoding, transcoding, or even just distribution of television signals, Video Clarity is now offering the ClearView Shuttle 4K which was designed to compare an original signal to a downstream version on a frame-by-frame basis.
FEATURES
The ClearView Shuttle 4K comes in a package that’s small enough to be considered compact. The unit itself measures a mere 8.6-by-3.5-by-13.75-inches and weighs 11.5 pounds (15 pounds in the supplied hard carrying case). Power is supplied via standard PC power cord, and connections include LAN, PC monitor, keyboard and mouse. The front of the unit sports an LCD readout, along with the standard “U,” “D,” “L,” “R” menu and data entry buttons. Each I/O module (AJA Kona) supports an analog output, and four BNC 75 Ohm “mini” connections via a BNC convertor cable (8-or 10-bits per component). Among the video standards supported are HD/UHDSDI, SMPTE-259/292/296/424/425a/b, 4K/quadHD, and HDMI output on a mini-connector with convertor cable. The ClearView Shuttle4K also accommodates SD at 525i/59.94,625i/50, HD at 720p/50, 59.94, and 60 Hz; 1080i/50, 59.94, 60; 1080psf/23.98 and 24; 1080p/23.98, 24 25, 29.97, 30, 50, 59.94, and 60 Hz, as well as UHD at 3840x2160p, 23.98, 24, 25, 29.97, 30, 50, 59.94, and 60Hz. There’s also a trilevel reference input.
The unit can play or record up to 2160p/60 Hz (two 30 Hz sequences side-by-side) and in 4K.
Audio standards include analog, 24-bit 48 kHz PCM, AES/EBU discrete and embedded.
The unit features four full reference scoring methods or scales, including MOVIE (Motion-based Video Integrity Evaluation index), MS-SSIM/DMOS (Multi-Scale Structural Similarity Image Quality Assessment, with “DMOS” being the difference between the mean opinion scores of the reference and processed video). There’s also JND (Just Noticeable Difference) and PEAQ (Perceptual Evaluation of Audio Quality), with two scales produced from a computerized model of the human ear (BS.1387 and BS.1118).
The professional video industry's #1 source for news, trends and product and tech information. Sign up below.
In addition, the ClearView Analyzer includes four no-reference scoring methods: APEAK (which is a true-peak audio measurement of the audio channel per ITU-R BS.1770-3) and LKFS (the audio loudness measurement per program according to ITU-R BS.1770-3), Spatial (which calculates the activity power of a video frame, with a higher number indicating more changes in that frame) and Temporal (which calculates the changes between successive video frames, a zero indicates a frozen frame).
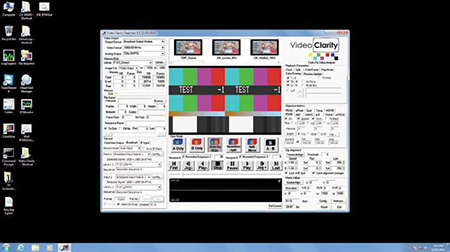
A key feature of the ClearView GUI is that two sequences can be displayed in a variety of ways, including: “Side-by-Side” (or over-under), “Seamless Split,” “Split Mirror” (butterfly), “A-minus-B” (with threshold and color addback), or “Full Screen” (with each sequence sent to a different display or on-eat-a-time to the same display). If a closer examination is needed, video sequences can be analyzed while playing individual fields, with the operator zooming into any picture area up to 16x and or panning within the picture during zoom or split screen, with identification of pixel values accomplished via a mouse click.
The most widely used metrics are PSNR (Peak Signal-to-Noise Ratio) or MSE (Mean Squared Error). Both measure the mean error between input and output signals. PSNR expresses its result as a ratio of the peak signal expressed in dB. PSNR and MSE (while not performing a human perceptual prediction,) also serve an important role. PSNR is the objective metric that measures the absolute difference between two signals.
For audio, the ITU-R PEAQ model amounts to an “electronic ear” that performs an objective measurement of perceived quality of wideband (up to 20 kHz) audio signals using a computerized model of the human ear. The Audio Frequency Metric (AFREQ) is a comparison of audio versus a reference and is used to detect gross audio errors. Also included are Audio Alignment (lip-sync) and APEAK, which measures true-peak amplitude and gives a value for each frame, and a separate value for each channel in LKFS (Loudness K-weighted relative to Full Scale) units.

Video Clarity ClearView Shuttle 4K screen shot
IN USE
Starting up the 4K Shuttle was fairly straightforward as it involved basically only connecting a power cord and PC monitor. The included wireless mouse/keyboard combo came up immediately and after a few seconds the unit completed its “boot up,” resembling most any PC display. The audio/video I/O for the Kona card was located on the back of the device, and the unit’s umbilical was solid, well-built and adequately labeled. (While there is an LCD screen on the front of the unit, I preferred to use the external PC monitor for my evaluation.)
The next order of business was to read the included “quick start” guide and once I had wrapped my head around what the Shuttle 4K could do, I decided that the best application would be to test the signal integrity of my television plant.
For a video reference signal, I connected an HD 1080i signal from our NBC d.a. chassis into the unit’s Channel 1 video input (it feeds the Kona card). For a measurement signal, I elected to test the amount of degradation added by our routing system, downstream keyers, STL, RF exciter, transmitter and off-air demod.
After confirming the Shuttle 4K for two SDI inputs, I was able to record both the reference signal (not timing, but the original benchmark) and the signal for test by using the “Record” button on the GUI. I should note that once those recordings are made, there’s a window for playback (much like a video editing system) with standard playback controls. However, for such testing to work it’s necessary to align the two clips. For this task, the viewing options are “A Only,” “B Only,” “Side by Side,” “Seamless Split,” “Split Mirror” and “Aminus-B.” I was most comfortable with the “Side by Side” mode.
For alignment, there are some options; actually a lot of options. However, a few things were basic and obvious, such as “Lock A/B speed” and “Save Alignment Changes.” In short, the goal is to get the two video clips aligned on the same frame. By using the “First” and “Last Frame” selectors to offset the time delay in the clips, I was able to get my clips aligned (raw clip, and the one passed through my system). In the scene I was using, there was a mother and child segment and I found a frame where the mother was blinking her eyes and was able to use that for synchronizing things.
Once you get the clips aligned, you can then run a metrics test. I ran the test for PSNR and was able to get a “kind of” flat graph line on the error display. In addition to the graph display, there are also numerical displays indicating the current, minimum, maximum, and average values specified in dB. My average for this test was 15.29 dB and while this isn’t a really great number, I should point out that signal encoder is 13 years old, as is my STL (I just ordered new ones).
Just for fun I ran a metrics test using color bars feeding both inputs and ran a pathological test with completely different signals feeding both inputs. As might be expected, the former comparison tested really good and the latter wasn’t so good (100 and 0.82 respectively).
As for record keeping and review functionalities, I was easily able to create, and save session logs in a neat NotePad-type file.
SUMMARY
I will have to confess that upon starting out, this instrument is almost intimidating. It’s very powerful, and the test options are really abundant. However, after spending a few minutes with it, much of that feeling of intimidation goes away. The ClearView Shuttle 4K is really an awesome instrument and gives networks and broadcasters another great tool for maintaining a competitive edge in image quality for their viewers. And while I didn’t mention too much about the different views the device offers, I would like to note that for anyone who ever aligned a three-tube color camera by using the “minus G” channel, the ClearView Shuttle 4K’s “A minus B” alignment is very similar.
Joey Gill is chief engineer at WPSD-TV in Paducah, Ky. and has been with the station for more than 30 years. He has worked in television since 1977. He may be contacted atrespond2jgill@yahoo.com.
FAST FACTS
APPLICATION
Audio/video signal and network analysis
KEY FEATURES
Portable, versatile inputs, powerful toolsets, logging functionality
PRICE
MSRP as tested, $44,995
CONTACT
Video Clarity US 866-748-8072
