Exterior Scenes Can Present Challenges
A big misconception in our industry is that daytime exteriors are the easiest time to shoot because of the amount of available light. In truth, they can be the most difficult. This is simply because you have less control. On a stage or location with minimal windows, we are fortunate to be able to manipulate the light and maintain a look with ease. Cinematography is about image control and repeatability. The ability to have control over the frame you are creating and then being able to repeat that same look as you clock around a room is the whole point.
I want to talk about both daytime and nighttime exterior scenes, as they both present challenges and I just wrapped on a commercial, “Visions,” that was solely exteriors at every time of the day and night.
SHOOTING DAYTIME EXTERIORS
Daytime seems straightforward to most, but it requires just as much preparation to get it right. You are typically fighting one of two battles: softening and cutting what’s already there while supplementing the shadows, or attempting to add highlights to a very flat image.
Unfortunately we cannot move or slow down the sun as much as we find ourselves wanting to, so we have to strategically choose locations and place our actors and camera. The time zone and the time of year also have an effect on your shoot as well. The most common and simple thing I do outside on a sunny day is just supplement the shadows with a bounce board on tighter shots.

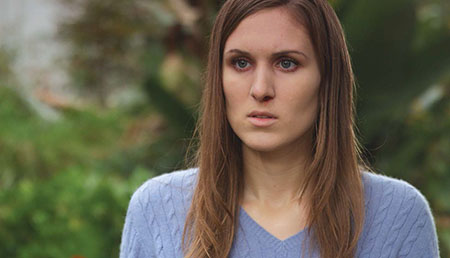
Fig. 1: Using lighting technology on daytime exteriors can add edges on actors while softening the bright sun overhead, which was necessary for this opening scene of “I Blame Monty Hall.”
However, using lighting technology on daytime exteriors can be the key in achieving more sophisticated scenes. Most especially, having daylight units to add edges on actors while softening the bright sun overhead or dealing with a flat, cloudy sky can create separation and depth. ) I had to do this on the opening scene of “I Blame Monty Hall,” (Fig. 1), so there was some separation.
It can be easy on a cloudy day to have your units look like lights off to the side, so softening and spreading the beam can help hide your work. Outside, you have the biggest light source available to us, the sun, and it becomes about controlling the quality and amount of shadows.
The professional video industry's #1 source for news, trends and product and tech information. Sign up below.
Another common technique that goes without saying is pointing the camera toward the sun. Using the sun as a backlight can help avoid harsh front light on your subjects while simultaneously providing a backlight.
Often, controlling the harshness of the sun as a backlight is called for because we can only supplement the shadows so much before it starts to look unnatural. However, using the sun as a backlight tends to prove a bit easier than trying to control it as a front key light and just looks much more pleasing. As always, understanding what ratios you want to set and the capabilities of your camera will also help decide how to treat the light.
SHOOTING NIGHT EXTERIORS
Night exteriors present a new group of potential lighting techniques. The biggest topic of discussion for these is moonlight: How bright is it? The answer to this question varies with every film and cinematographer.
Some level of ambient moonlight can be very difficult to pull off because only so much light is in your arsenal and at some point that light will fall off into darkness. This can make a scene feel like it is, in fact, on a stage, because you can only see so far into the world.
For this reason, many cinematographers choose not to recreate moonlight at all. They may lack the large balloon light that is commonly used to create a large enough ambient light or simply not gravitate toward the look of it. In all the scenes that I have shot outside at night, I have found it best not to try to create moonlight unless there is absolutely nothing else.

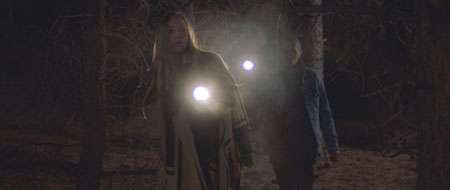
Fig. 2: In this commercial, “Visions,” a haze was added to enhance the beams of the flashlights as the actors searched the woods.
In this new commercial, “Visions,” we had a night scene in the woods (Fig. 2) where the actors were searching with flashlights. To enhance the beams, we added haze, but I also wanted to see the trees. The shots were contained enough so I could backlight the trees without feeling like I had to fill a large space.
This also presented the common challenge of balancing color temperature. Deciding how bright your moonlight is is just as important and subjective as what color temperature it is.
I lit the entire commercial with Aputure 120d and 300d lights, and then threw some color temperature blue gel on the pair of incandescent flashlights.

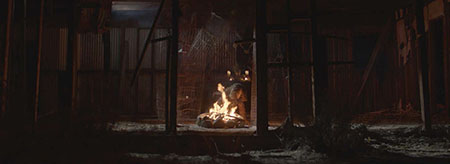
Fig. 3: In the same commercial the scene was lit with the fire and a soft beam of moonlight with a 120d up in the rafters of the structure.
The final scene of the commercial was shot at night into an abandoned structure featuring a witch working around a fire, (Fig. 3). My initial instinct was to extend the effect of the fire with a warm key off to the side that was higher than the flames. Of course, this ended up not happening, and to make it the most natural and interesting, we lit solely with the fire, and added a soft beam of moonlight with a 120d up in the rafters.
This also spilled into the foreground in front of the structure, edging the weeds and dirt. The structure provided the contained area where I could create moonlight, but didn’t feel like it needed to extend very far.
The sun’s natural light can throw some interesting challenges, but if you scout and have the tools necessary to deal with it, you can create something you intended. Just like with interiors, you want control intention in each shot with the light.
Julia Swain is a cinematographer based in California, whose narrative films include “Killing Animals,” “Jilted” and “Cassidy Red.” She continues to shoot on a variety of formats, seeking to create compelling visuals for every story and brand. She can be contacted through TV Technology.
