Proper microphone placement
When you want to record or amplify a given sound source like a voice or a musical instrument, it is obvious to place the microphone in the near field close to the source. This sounds easy. However, there are some acoustical and technical matters to consider in order to make it sound right. This article will briefly outline some of the important issues.
The sound source
The first thing to consider is the sound source itself. What does it sound like? How loud is it? Is it possible to catch the essentials of this source just at one pickup point? Remember, many musical instruments only sound right if all the radiated sound is summed up by the acoustical room. Selecting the best microphone position is a subjective choice.
The voice

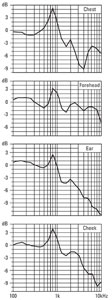
Figure 1. Four curves are shown. The upper curve quantifies the way the speech spectrum picked up at the chest differs from the spectrum of the same person’s speech is picked up at 1m. [Ref: Brixen, Eddy B.: AES Convention no. 100, Copenhagen, Denmark. Preprint 4284.]
The voice should be picked up in a way that meets all demands for naturalness, timbre and intelligibility. Actually, what is perceived as a natural-sounding voice is what we hear in front of a speaking person, and at a distance of approximately 1m.
In broadcast and live sound environments, sound engineers will often opt for a lavalier microphone (chest worn) or a headset microphone (head worn), as these allow more freedom of movement for the artist, commentator or presenter. One should be aware of the fact that placing the microphone at this shorter distance results in a recorded spectrum that is different from the natural and neutral spectrum perceived at a normal listening distance. This difference is far from negligible.
The professional video industry's #1 source for news, trends and product and tech information. Sign up below.
From the curves shown in Figure 1 it can be seen that there is a general tendency of the spectrum of voice to raise around 800Hz, which basically must be considered and compensated for. However, the most important deviation to be aware of is the attenuation that causes reduced speech intelligibility.
The speech spectrum at the typical chest position has a lack of frequencies in the range of 3kHz to 4kHz. This frequency range is extremely important for obtaining speech intelligibility. If a microphone with a flat frequency response is positioned on a person’s chest, the 3kHz-to-4kHz range should be boosted around 5dB to 10dB just to compensate for the loss.
In reality, there are two solutions: Use a microphone that is pre-equalized to compensate, or remember to make the right equalization in the editing process. Note that no ENG mixers or cameras automatically compensate for this, and no controls are provided to do so. In many cases ,this is not compensated. Hence, the intelligibility is often low.
If a microphone is positioned in a fixed position on the chest or mounted on a stand in front of a person, turning of the head may change the level and the timbre of the voice. This problem is solved by using a headset microphone. Also the level is approximately 10dB louder at the cheek compared to the chest position. So, there are many reasons to use headsets — i.e., the spectrum is less affected compared to the chest position. However, to some degree, a high-frequency rolloff has to be compensated.
Interestingly enough, a forehead position (close to the hairline) — as is often used in film and stage performance — is relatively neutral regarding speech intelligibility.
Handheld microphones are often used for interview/voxpop. If possible, the microphone should be kept in a fixed position. This prevents the microphone from being at the wrong position at the wrong time. However, if the background noise it is a problem, the obvious solution is to move the microphone closer to the speaking person.
Unwanted sources
Another solution for reducing unwanted background sounds is to choose a microphone with higher directivity — typically a cardioid type. Using a shotgun/interference tube microphone is rarely efficient, especially if the noise predominantly contains low frequencies, for instance, at car racing tracks and similar locations.

Figure 2. When placing directional microphones, it must be noted that reflected sound can “bypass” the microphone’s rejecting direction.
All cardioid microphones exhibit proximity effect, which is often useful when fighting background sound. The proximity causes a raise of low frequencies when the sound source is close to the microphone. On the other hand, when equalized for the right tonal balance, the same effect will provide a reduction of low frequencies of distant sound sources. By the way, remember that most cardioid types of microphones exhibit most proximity effect on axis. This is why handheld cardioids should not be addressed from the side. (Many untrained microphone users treat the microphone like an ice cream cone.)
When placing a directional microphone in front of large surface — like the front of a kick drum, the back of an upright piano or just in front of a person’s cheek — it must be noted that reflected sound can “bypass” the microphone’s rejecting direction. (See Figure 2.)
Noisy microphone
Under some conditions, the noise may be generated by the microphone. Electrical noise (microphones’ self noise) should not be a problem, as the sound pressure level from the primary source is high. However, mechanical noise, such as handling noise, and also wind-generated noise, have to be considered.
It should be noted that, in general, omnis (pressure microphones) are less sensitive to mechanical vibrations and wind, compared to cardioids (pressure-gradient microphones).
Mechanical noise can even be transmitted by the cable. Also, noise from clothing can be a problem, for example, when hiding a miniature microphone. This is especially a problem with body-worn microphones in film production and explains why various gadgets have been developed to reduce the problem.

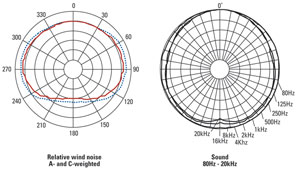
Figure 3. Varied factors have to be taken into account in close miking applications. For instance, it is desirable to mount chest-worn omnis upside down, because that way, less noise is generated from breathing.
When using a cardioid headset microphone, it is advisable to use a windscreen, as this can reduce wind-generated and popping noises.
In general, omnidirectional miniature microphones have perfect directional characteristics. When it comes to wind sensitivity, they are more sensible on-axis. So for chest-worn omnis, it is an advantage to mount the microphone upside down, as the sound quality remains the same, but less noise is generated from breathing. (See Figure 3.)
RMS and peak level
Last — but not least — what kind of SPL can be expected from the sound source? When we speak about the level, we normally mean the SPL —the RMS value. That’s a kind of mean value. However, what is more interesting are the peak values, because these values may be 10dB to 20dB higher than the related RMS value.
For instance, if a (loud) singer is able to produce a SPL of 140dB at the lip plane, this may result in peak values far above 150dB.
Inside a kick drum, close to the bell of a trumpet, close to explosions, extremely high peaks can be expected. In the recording channel, “space” must be prepared for that. So, the microphone should be able to reproduce the high levels, and the input stage should be able to cope with signals that can be as high as 1V.
Using sound
Close miking has many applications. It is a good technique, and it provides good separation. However, care has to be taken in order to achieve the best sound quality.
—Eddy B. Brixen is an audio specialist at DPA Microphones.
