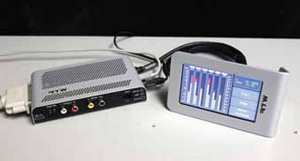
The RTW TM3-6CH Audio Loudness Monitor
One of the trickiest conversations a broadcast professional can get into just may be about monitoring audio. During the past few years almost everyone in the business has come to agree that audio loudness is a really big issue. With standards such as EBU-128, ITU-R BS.1770-2/1771, ATSC A/85, and ARIB, it seems that the world is settling into agreement. For those of us who’ve ever tried to explain to a producer why a peak meter should just peak in the red “occasionally,” loudness meters are sent from heaven.
RTW, a leading European audio monitor/ control manufacturer based in Cologne, Germany, has taken the professional audio monitoring market by storm over the past few years, capitalizing on the boom for loudness monitoring systems. One of their latest offerings, the TM3, is a compact model that fits literally anywhere.
FEATURES
The TM3 display unit features a 4.3- inch capacitive touchscreen (with superb brightness and resolution), along with a compact I/O control unit. The display unit operates with either horizontal or vertical orientation, and comes standard with a two-meter connecting cable, for mating up with the control unit. The display unit is just a bit larger than an iPod, and the I/O control unit measures 5-3/4 x 3-3/8 x 1 inches. Connections on the I/O include a DB-25 for balanced audio in/out, analog L/R input RCA connectors, S/PDIF input/ output RCA connectors, an RJ-11 for GPI/O, a four-pin locking DC connector, and two USB connectors for PC and TM3 connectivity. For analog input calibration, there are two multiturn micro potentiometers, with very fine adjustment capabilities. The unit requires 24 VDC, draws less than 2 amps, and can operate at temperatures between +5 and +40 degrees C. It measures loudness in all of the standards mentioned previously, and can display as many as six audio channels. Other features include a stereo correlator, Dialnorm measurements, AES3 status monitor, loudness range descriptor, and numerical displays.
IN USE
After unpacking the TM3, hookup was a snap. Using the simple labels on the unit, I connected the display to the control unit, plugged in the power, and connected my old PC laptop to the control unit. The only assistance I really needed was a log-in name and password so that I could download the “Devicer DC1” configuration application from RTW’s Website (both Mac and PC versions are available). My German is a bit rusty, so I had to guess as to which dialog box meant “I Agree” to the terms, but after a couple of tries I was successful. (This was the only area in which English was not available during the process.)

After I downloaded the “Devicer,” and opened the program, I did have to unplug the USB from my PC, and re-insert it. When the application connected to the TM3, the upper right portion of the screen displayed “TM3 on USB” in red letters, and there was a “cog” on the dialogue box to indicate “tools.” On the screen, the system was obviously set to “demo” mode, as it was a six-channel display with meters moving all over.
After poking around the menus a bit, I figured out how to get out of demo mode, and using the “Audio Group” dropdown, I selected the two-channel stereo input.Although the unit is capable of six channels of digital audio, I found it a lot easier to try it out with analog sources.
The professional video industry's #1 source for news, trends and product and tech information. Sign up below.
Other menu items included “Presets,” with a dropdown that included: Loudness Sum, LRA, Loudness Numbers, PPM Buttons, and Correlator Buttons. The “Instrument” dropdown revealed “Bar Orientation," “Mode,” and “Keys.” Under “Audio Group,” one could select audio types, and under the “Tool” button, names could be assigned, along with identifying colors, mode selection, and Loudness Format displays.
After I got all of my settings the way I wanted them, I saved them—using the “cog” icon at the top right—under the name of “TV Technology.” With that name highlighted, I pressed the big red up arrow, and was prompted to “press and hold the TM3 display.” After a few seconds, the display on the TM3 changed from sixchannel demo to a silent stereo metering display. At this time, I connected left and right outputs from an analog audio test generator to the unit’s inputs. At 1 kHz and 0 dB, the meters were running in the red. Using the associated trim pots, I was able to adjust the metering to my liking. During the next few days, I used a combination of test-generated signals and live audio from various sources.
During the evaluation period, I learned how to change presets by “swiping” my finger across the screen, and I also became very confident in its reliability. While a complete instruction manual was included, I was able to figure out most things without using it—the unit’s operation is very straightforward.
SUMMARY
I tested the audio monitor non-stop for more than a week on my test bench, and there were never any issues. The combinations of channel assignment and configuration are almost limitless with this device and I’m not going to even try to mention them here. If you’re looking for a slick monitor for quick, easy-to-use, and professional audio monitoring, you can’t go wrong with the TM3-6CH.
Joey Gill is chief engineer at WPSDTV in Paducah, Ky. and has been with the station for 30 years. He has worked in television since 1977. He may be contacted atrespond2jgill@yahoo.com.
