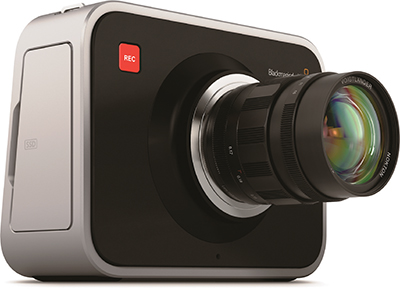
Blackmagic Design Cinema Camera

Blackmagic Design Cinema Camera
Let’s get right down to the elephant in the room—Blackmagic Design has been having problems delivering their Cinema Camera which was announced at the 2012 NAB Show and slated for shipment 90 days thereafter. However, sensor defects stalled those deliveries. After a year, shipments are beginning to catch up with backorders. Blackmagic worked earnestly to solve the sensor manufacturing problems (it was supplied by a third party) and to be as transparent as possible with its customers during all this. The wait was well worth it.
FEATURES
This 2.5K camera shoots 12-bit raw, ProRes HQ and 10-bit DNxHD and is bundled with a full version of Blackmagic Da-Vinci Resolve and Blackmagic UltraScope. Initially Blackmagic announced the camera would ship with a Canon EF mount capable of electronic control of Canon EF lenses. Several months later Blackmagic revealed a second version, with a Micro Four Thirds mount, albeit without electronics.
The camera is based on a 15.81 x 8.88- mm sensor—larger than a Micro Four Thirds, but smaller than the APS-C or Super35 sensors used in many DSLRs and dedicated digital cinema cameras. Blackmagic advertises 13 stops of dynamic range and after some very loose tests in my favorite camera torture chamber (New York City’s Times Square), I have no reason to dispute that figure.
A great deal of this camera’s charm— and its limitations—stems from the utter simplicity of its design. Pushing the iris button auto-exposes; exposure on non-aperture ring lenses is adjusted by pushing the iris button, followed by transport buttons, to open or close the iris. The focus button turns peaking on or off for focus assist.
The large view screen includes a sunshade, but often isn’t enough for bright outdoors work. The screen also displays menus that are limited but adequate.
Camera menus allow setting of camera name, date/time, ISO and shutter angle. ISO is limited to 200, 400, 800 and 1600. The camera itself is rated at ISO 800. There are six color temperature presets (3,200, 4,500, 5,000, 5,600, 6,500, and 7,500 degrees Kelvin). There is no auto white balance option, but when shooting raw, color temperature is far less an issue. Finally, the shutter angle defaults to 180 degrees, with slow and fast shutter settings, as well as a 172.8-degree shutter that optimizes 24p shooting in 50 Hz lands.
The professional video industry's #1 source for news, trends and product and tech information. Sign up below.
Audio settings control channels and levels, but there’s no audio level indication, making external meters a necessity unless you simply want to guess. (I don’t and hope that Blackmagic will address this deficiency in future firmware updates.)
The recorder menu controls recording format, frame rate and time lapse, as well as what Blackmagic calls “dynamic range.” There are two options in dynamic range: film and video. “Video” means Rec. 709 color space; “film” means log. These are available only for ProRes HQ or DNxHD formats. Raw defaults to film mode.
Display settings control brightness, zebras, SDI overlays and dynamic range. Another note: the only camera metering consists of zebras, which do not go below 75 percent. (Exposure control is the weakest part of the camera.) However, there is an amazing feature hidden in non-standard terminology.
As noted above, dynamic range presents “film” and “video” as choices. What this means is that when recording in film (log) mode and viewing in video, you are applying a Rec. 709 look-up table to the image for more accurate viewing.
If you tap the viewscreen twice, it zooms for expanded focus. Tap once and you get a slate with mini keyboard with anything entered being written to clip metadata.
The camera writes to solid-state drives inserted into a slot. These have limited insertion/removal cycles and a more permanent caddy mount would prolong media life. Blackmagic has a list of qualifying drives, but more about that later.
I/O ports include BNC SDI out, Thunderbolt, headphones and two audio channels, with the audio input jacks being RCA phono plug-type, rather than XLR.
The camera’s internal battery is rated for 90 minutes of use between charges and there’s a connector for AC power or external batteries.
IN USE
Far too often I end up testing cameras by shooting sleeping cats, skittish squirrels and the like. I decided to test this time in some actual video production, and connected with Josh Apter at the Manhattan Edit Workshop and Peter Olsen, DP, who were working on a project.
My test camera came with a Kingston 120 GB SSD, qualified by Blackmagic for raw recording. That card would hold about 15 minutes of raw footage. We recorded perhaps 10 minutes for the first scene before switching to a SanDisk Extreme 480 GB SSD that I own.
The camera was mounted on a Zacuto mini-baseplate, and rear rails attached for my Zacuto cheeseplate with Anton/Bauer battery mount. I brought along two Dionic 90 batteries and a charger for the occasion, but the camera’s internal battery and one of the Dionics saw us through the all-day shoo. When we finally wrapped, there was still charge remaining in the one Dionic that we did tap.
Audio is an issue. For this shoot, I borrowed a dual XLR-to-phono plug adapter to allow use of a Sennheiser MKH 416 mic.
That solved that, but we still had to deal with exposure and levels. My solution was to connect the camera to my MacBook Pro Retina with a Thunderbolt cable and use Divergent Media ScopeBox for setting exposure and monitoring of audio levels.
We found that the Blackmagic Camera can get hot—actually so hot that I burned my fingers in removing the SanDisk SSD. This was after about 30 minutes of continuously being powered on and used for number of takes. The camera didn’t shut down, but heat is nobody’s friend.
Peter felt the camera was a bit awkward in its form factor, but that didn’t impede his workflow. And we all agreed that the smaller-than-Super35 sensor combined with f/2.8 lenses meant that depth of field was not as shallow as we would have liked for a couple of interior shots. When shooting indoors, the large display screen was easily visible and it was easy to achieve focus with the camera’s peaking and zoom features.
We shot raw only to test workflow, image quality and usability of the raw format— and it was here that we encountered problems.
Throughout the shoot, I transferred footage from the SSDs to an external drive for the editor, reviewing clips only on the camera. By the time we wrapped, I’d transferred everything to the drive for my work and later made a copy for the editor.
I first looked at clips from the SanDisk 480 through DaVinci Resolve. Thumbnails came up properly in the viewer window and everything moved nicely into Resolve’s Media Pool.
However, when I checked the establishing shots from the SanDisk I got folder icons, meaning there were dropped frames. Opening the folders showed a number of DNG files and the separate audio wav, but they had to be imported as individual DNGs rather than as an assembled clip. Several more tests with the SanDisk revealed dropped frames after 10 seconds of shooting.
As I later learned from the forums (and not in Blackmagic’s documentation), the record light should be solid red when you’re recording. A blinking red light indicates dropped frames. As much as we had read about the camera, none of us knew this on set, so we were not looking for it. (In addition, anecdotal reports online revealed numerous failures with this SSD after a week or more of use.)
Fortunately, the editor was able to reconstruct the scene from several takes and we ended up with useable footage. Be forewarned that using consumer-level SSDs to write the massive data rates and quantity of raw footage really pushes the technology to its limit. (I should note that anecdotal reports of the SanDisk 480 have revealed it to be rock solid and I have yet to have read of a reported failure.)
The images were the nice part. When brought into Blackmagic DaVinci Resolve we had superb skin tones and almost no noise at ISO 800 (and very little at ISO 1600). In short, it was difficult to imagine that a $3k camera could produce such beautiful images as the ones we had captured.
SUMMARY
The Blackmagic Cinema Camera is revolutionary in its technology and price point. It’s the next level beyond the DSLR and I strongly recommend it for those graduating from DSLR work. However, it should not be compared to RED, Sony F3/F5/F55, or cameras costing many multiples of $3K. Use it for the same jobs you would use a DSLR. Use it for documentary work with one of the many rigging options available. Be wary of SSD drives and watch for dropped frames, particularly in raw. Always carry a spare SSD. And be prepared to spend more for rigging, monitoring and other options. Blackmagic has an aggressive firmware development program and I hope that the issues mentioned will be addressed.
Ned Soltz is an independent video shooter, editor and producer, as well as consultant and general technology guru. He has more than 30 years experience in video, first learning to shoot on a “Sony Portapack” and editing on reel-to-reel tape. In addition to current production and consulting projects, he is a contributing editor for Digital Video magazine.
FAST FACTS
APPLICATION
Digital cinema-style shooting
KEY FEATURES
Great image quality, simplicity, attractive price point, bundled software
PRICE
$3,000 MSRP
CONTACT
Blackmagic Design
408-954-0500
www.blackmagicdesign.com
