Lighting Up the Night

One of the oft-touted benefits of digital cameras is their amazing light sensitivity. As CCD and CMOS technologies continue to improve, the low-light abilities of newer cameras (especially the larger-chip cameras) also improve.
This doesn’t mean, however, that when shooting a night scene you don’t have to light. When it comes to image acquisition, lighting is still the art that separates the amateurs from the pros. There is an art and science involved in lighting to make things look dark, but lighting for night isn’t as complicated as many people make it out to be. With a few easy techniques in your bag, you can have the fundamentals to tackle almost any night lighting situation with ease.
Night lighting was a bit of a conundrum for me in the earlier parts of my cinematographic career until my buddy Chris Probst, a fellow cinematographer, and I began to dissect cinematographer John Bartley, ASC’s incredible work on the early “The X-Files” TV series.
Bartley, along with Thomas Del Ruth, ASC, (“The West Wing”), who shot the “The X-Files” pilot episode, is one of the most influential cinematographers in television. Both helped change the landscape and visual language of primetime television into a more “feature film” world.
Breaking down Bartley’s night lighting, Chris and I developed a simple three-step system that became the basis for much of the night lighting we did from then on. Although I’m not typically a proponent of teaching classic three-point lighting, as I find it far too limiting and not always practical, this particular technique falls exactly into that definition.
THREE-STEP SYSTEM
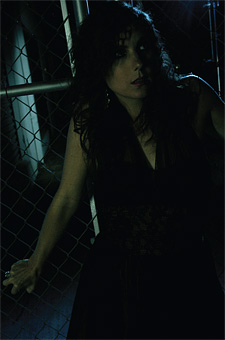
The first step is edge light. One of the key factors that sells the ‘night’ look is a sharp, well-defined edge on your talent’s face. This is often best achieved with a 3/4 backlight above the head height of the talent; and it is normally the brightest area on your talent’s body, with the edge slightly overexposed by a stop or a stop and a half.

John Bartley, ASC's nocturnal lighting in "The X-Files" series was an invaluable inspiration to my own lighting approach. This hard edge, along with surrounding darkness and underexposure, is immediately recognized as moonlight, high streetlights or even no-light and evokes a feeling of darkness, as long as you keep the rest of the talent’s face and body underexposed.
That leads to the second step, which is soft, underexposed fill light. I’ll generally put this at a stop and a half to two stops underexposed. This can be on the camera side of your talent or on the off-camera side, depending on the scene and your taste, but it should be soft.
I’ll typically use a bounce card in this situation and bead board seems to serve best. This fill should just start to bring out the detail in the talent’s shadowed face, without giving us too much detail. The fantastic benefit to shooting digitally is that you can see exactly where your exposures are falling on a calibrated monitor and adjust accordingly.
The final step in this technique is backlight for the background. This isn’t the same as the specific edge on your talent and can often come from the opposite side or even directly behind the talent. This is your environment lighting and you’re better off making this a backlight to edge the environment just as you edge your talent. Front lighting or washing the background can tend to look false and artificial.
THE COLOR OF MOONLIGHT
Over the years, I’ve had a number of rather passionate discussions about the color of moonlight. I recall one cinematographer who fervently asserted that he had read moonlight with a color temperature meter and it was around 4000 K. Although I disputed whether or not his standard color temp meter could actually get a reading off of moonlight, I didn’t necessarily dispute the results.
As the moon is nothing more than a reflection of the sun and it is not necessarily biased by ambient skylight, it seems logical that the moon would be a rather cool blue color temperature, but not quite as high as standard sunlight. However, people don’t perceive real moonlight as blue. When you’re out at night and you’re standing in moonlight, it doesn’t look like “blue” light—it almost looks black-and-white (which is a factor of the rods in your eyes, which are more sensitive to low light, but less sensitive to color wavelengths) or “silvery.”
I’ve never really been a fan of deep blue moonlight and I think it’s become something of a visual cliché, but that’s not to say that your personal preference for or against blue is right or wrong.
I will generally cool my “moon” lighting slightly, if it’s a tungsten unit and I’m shooting a tungsten-balanced scene, then I’ll probably use a 1/4 to 1/2 CTB on the moonlight to cool it off from the rest of the scene a bit. Oftentimes I’ll then desaturate that blue a bit in post production and pulling the color tends to create that more silvery monochromatic look. In any case, I find the front fill is best if it is more neutral/white and as close to your proper color temperature as you can get. This overall technique also applies for an interior scene.
On my first 35 mm feature as a director of photography, many years ago, I was confronted with a situation in which the main character was in his apartment and the bad guy kills the power. How the heck do I depict a scene in an interior location when there’s no light?! The answer is, again, in the edge lighting.
Using that same technique, create a hard edge on your talent to pull them out of the darkness. This doesn’t necessarily have to even be explained or motivated. The audience generally accepts this without question. A soft front fill, underexposed, will help to bring out the details in the talent. This can even be a 1/2 light fill from one side of your talent’s face to keep one side in more complete shadow.

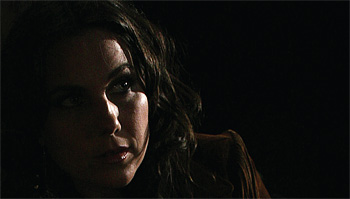
In this scene, actress Andrea Fellers peeks into the darkness in a "no-light" interior sequence. This is done with three fixtures, a 650W Fresnel for the edge light, a 300W Fresnel bounced into a 4x8-foot bounce card at the ceiling and a 150W Fresnel bounced into a small white card for front fill. The third step in an interior is actually what the late, great, Conrad Hall, ASC, called “room tone.” This is often a light bounced into a white ceiling or a large white bounce card up against the ceiling and set to several stops below key to just slightly bring up the detail in the room. If the light is large enough (the light fills a large portion of the ceiling or a large bounce card) it will feel “sourceless” and just provide enough information in the shadow details to make out an environment.
When shooting a dark interior scene, this is generally the very first light I’ll set up. Creating this overall base-level “room tone” sets the rough base-level exposure for the rest of the scene and gives me something to work from.
THREE-POINT LIGHTING
One of the problems I’ve seen in lighting tutorials—including this one—is that they primarily address a stationary subject. One of my main objections to teaching classic three-point lighting is that it typically only works for a subject that stays in one place. In practice, that’s rarely the case.
If your subject is moving throughout a location the best technique is to create “pools” of light for the character to move through. Don’t be afraid to have areas of darkness intermixed with areas of light.
If your scene is the killer quietly breaking in through the front door, you might start with edge light out in the hallway and no fill on his face as he moves into the door. Then as he moves into the room he can move into darkness and then, perhaps into silhouette in front of a dim window as he reveals his murder weapon and then back into a pool of darkness before landing in the three-light night look near the victim’s sleeping body.
This variation in lighting creates mood and ambience and feels realistic. Just be sure to highlight the moments the audience needs to see to understand the story points and don’t be afraid to vary your techniques.
Jay Holben is technical editor for TV Technology sister publication DV Magazine and frequent contributor to American Cinematographer magazine and The Hollywood Reporter.
The professional video industry's #1 source for news, trends and product and tech information. Sign up below.
