Three Strikes at HD Lighting

ALLENTOWN, PA
Lighting directors sometimes run across situations where a certain challenge must be overcome. I would like to look at three problems and simple solutions for each.

Photo 1HIGHLIGHTING DARKER SKIN TONES
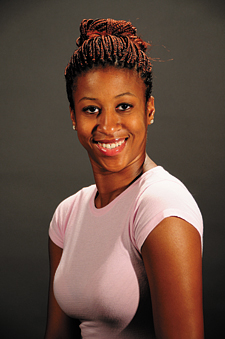
Chocolate gels are seldom used because most do not know of their existence. These brownish gels do three things exceedingly well: (as the name implies) make chocolate look more inviting, add warmth to wood surfaces, and highlight darker skin tones, making them pop. While shooting a dance video, the lead dancer had dark skin and in order to make her flesh tones stand out against her costume, I needed some creative lighting.
Dark surfaces absorb light and lighter surfaces reflect—in high definition, skin tones are extremely sharp and extra care is needed in lighting. Always being a fan of three point lighting, I had the key light (an Omni) on the right, an Omni pointed into an umbrella on the left, and a backlight (1K Fresnel) mounted high above in the studio's lighting grid.
Wanting extra warm on her skin, I gelled the Omni with chocolate gel clipped into the Omni's gel frame. Shooting through the chocolate gel, her skin tone radiates warmth that only a chocolate gel provides. The lighting created the highlights on her face, but the gel warmed her skin much like tungsten light would do outdoors without the overpowering "orange look" that mixed color temperates create. She now has just e-nough warmth in her skin without it being overpowering. The backlight gives her separation from the background and adds a nice highlight to her hair, while the Omni and umbrella filled in the shadows, (Photo 1).

Photo 2NICE REFLECTION ON YOU
How do you shoot someone wearing glasses without getting nasty reflections of the light in their glasses? The two easiest remedies are to have them remove their spectacles and the other is to have them wear anti-reflective lenses. The second suggestion is not always possible if your talent is already wearing the frames.
Besides the usual removing of the lenses (resulting in blind or squinting talent), raising or lowering the frames on their nose (often leaving red marks), the easiest solution is to diminish the glare with proper lighting.
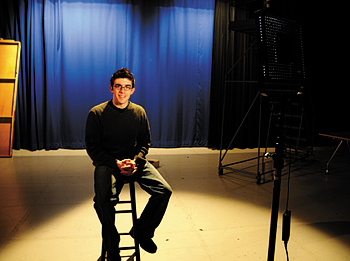
Direct lighting is harsher and will create stronger shadows; reflected light, although not pointed directly at your subject, will still show the reflection of the umbrella or source in the talent's lenses during close-ups. The easiest resolution in my opinion is to use an LED source as part of your three point lighting and raising or lowering the light until the reflections disappear. I know you can do the same thing with any light, but LED units have a shorter throw than a Fresnel and need to be placed closer to the talent. This close proximity to their glasses does not allow a sharp reflected image to appear in the glass lens. If you try diffusing a brighter source, you still end up seeing the upside down reflection in the lenses.

Photo 3 Fluorescent fixtures may also be used because they too must be closer to the subject, but LED units are small enough (and powerful), take up less space, and can be put closer to the talent. Another key factor in this scenario is to dim the LED light. Three feet from the talent is usually too bright and uncomfortable. This may also seem like common sense, but do not have your talent looking directly into the light—this will create a reflection. Instead, put your key light off to the left or right about two feet higher than your subject, pointing down at them. The shadow will fall on the flower and the glasses will have no unsightly reflections in the lenses, (Photo 2).
LIGHTING DIFFUSED

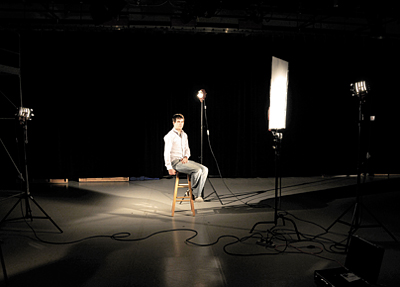
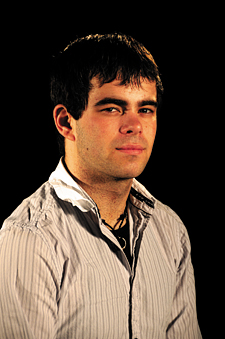
Photo 4 When shooting males with five o'clock shadows or a few days growth of beard stubble, hard, direct lighting should be your last choice. With only Fresnels available, I needed to soften the light's impact to diminish the shadows on Chris's face. Again using three point lighting, I positioned silk diffusion on a C-stand three feet from the 650-watt Fresnel Tweenie on the right (the side does not matter). The distance the diffusion is from the light source is important when shooting. Determine the best placement by moving it closer to or further from the light source. Since our Sony HVR-Z1U HDV camera would clearly see the facial stubble, I chose having the texture of the illuminated silk on his face take the prominent position. (Photo 3).
Another Fresnel Tweenie was used as the fill six feet from the talent at the opposite side and an Inky as a backlight. In the medium close-up image of Chris, you can still see the beard line on his face, but the diffusion lessens its punch slightly. (Photo 4).
There are very few situations you cannot overcome with the correct lighting. High definition now more clearly reveals facial flaws so your shadows must be placed correctly. Always let your lighting craft the mood while shooting; filters are difficult to remove or correct in post and if needed, I would rather add them during that process.
Chuck Gloman is program director of the TV/Film Department as well as a member of the faculty of DeSales University. He may be reached atchuck.gloman@desales.edu.
The professional video industry's #1 source for news, trends and product and tech information. Sign up below.
Chuck Gloman is Associate Professor with the TV/Film Department at DeSales University.

