The professional video industry's #1 source for news, trends and product and tech information. Sign up below.
You are now subscribed
Your newsletter sign-up was successful
SHAVERTOWN, PA.—Lighting for any scene should not be looked at as a symptom that needs to be cured; it really doesn’t need to be that painful. I constantly hear DP’s say that there is no time to light but with the right approach, this task can become quick and accurate while rendering pleasing results.
Before beginning any lighting set up we should have some kind of an idea as to how our subject should look once they are properly lit. You cannot abide by the saying, “I’ll know it when I see it.” With this approach, you will only hit and miss and maybe never achieve the look you want. I will not be addressing any particular camera in this article, because even though new cameras, formats and resolutions are making their way into our industry daily, it is lighting that will always be the determining factor when trying to depict a look, a mood or a page of script regardless of the camera used.
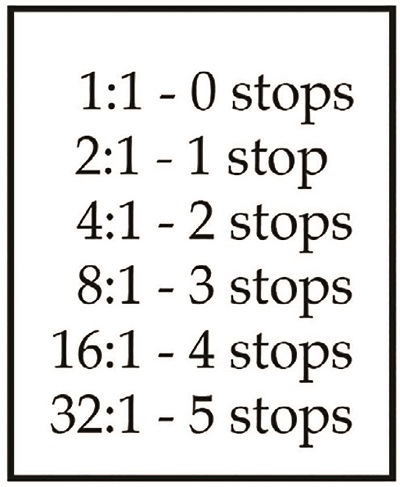
Fig. 1: This setup illustrates how to determine a lighting ratio. Lighting a one-person interview in a studio situation is actually an ideal way to learn how to light because the subject is stationary and the overall size of the background is limited. You should always practice a lighting approach prior to using it on an actual job.
EXPOSURE SETTING
First, you need to decide on the lighting contrast or ratio you are planning to establish. The more diffused the key and fill lights are, the less contrast the shot will have and it will render a more gradual or soft transition from high light to shadow areas. Less diffusion will render high contrast and a harder transition line between high light to shadow areas.
Before lighting our scene, we need to determine what our base line exposure will be. This is the exposure produced by our key light. We need to establish our key light and its output before we can begin lighting our scene. My exposure setting preference for lighting an interview is normally f-4. This f-setting holds a relatively shallow depth of field, without losing focus if the subject should lean one way or the other. And f-4 renders abundant lens resolution since we are not using the widest opening on the lens. Lighting for f-4 also allows me to light my subject with ample light output derived from most professional light instruments.
Of course, the amount of light output needed to light at f-4 depends on your camera’s effective ISO rating, its resolution and the lens configuration that you are using. It is best to determine the f-setting suited for the scene and then light to it, rather than setting up whatever lights are convenient and then ratcheting the aperture ring until there is enough exposure to render an image.
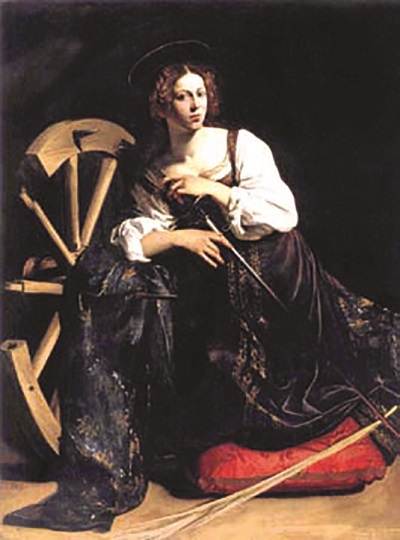
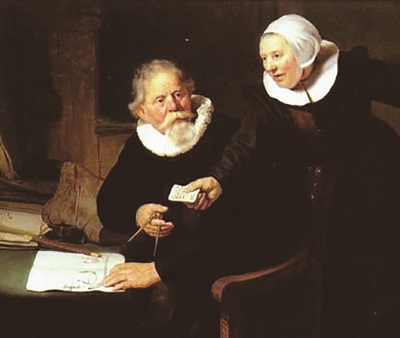
Fig. 2: These paintings by Carvaggio (L) and Rembrandt illustrate how diffusion and ratios can affect a scene. I use an incident light meter to read the key light and to establish our f-setting. This setting becomes our baseline for the rest of the lighting on our set. Next, we need to determine the ratio between high light and shadow. I normally will light a male subject with a 4:1 ratio and a female subject with a 2:1 ratio.
The professional video industry's #1 source for news, trends and product and tech information. Sign up below.
Let’s use an interview head shot setup to illustrate how to determine a lighting ratio. For a headshot, a 1:1 lighting ratio would render our subject’s high light and shadow area as the same exposure value. A 2:1 ratio would render the shadow area 1-stop darker than the key, a 4:1 ratio would render the shadow area 2-stops darker and so on (see Fig. 1).
To illustrate how diffusion and ratios can affect a scene, Fig. 2 are paintings by Caravaggio and Rembrandt. The key lights depict the Caucasian flesh tones with much the same exposure value but notice how Caravaggio’s treatment of hard light and extreme shadow are the elements that make the two paintings distinct.
SHADOW AREA
Once you establish your ratio, you can use a spot meter to read the shadow area. If your key light is f-4 and you want your shadow area to be 2:1, or one stop darker, then your meter would need to read f-2.8 for that shadow area. You can maintain the same ratio throughout the scene by exposing all high light areas at f-4 and all shadow areas at f-2.8, or you may choose to alter the ratio in the background, somewhat, from the subject’s ratio.
For instance, you can keep background highlights consistent with your key while using a 4:1 ratio for background shadows. To do this, you would read the background high light and shadow areas with a spot meter. While the highlight area should read f-4, the shadow area would read f-2 to render a 2-stop difference in the shadow.
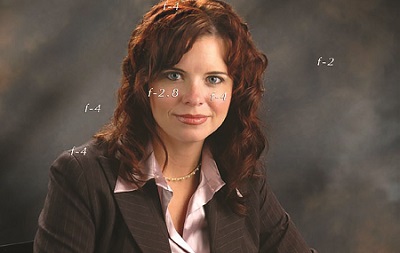
Fig. 3: This interview lighting setup uses a diffused key and fill light, with a 2:1 ratio on the subject and a 4:1 ratio on the background.BEING PREPARED
Now you know exactly how to set your lights for this scene. This is a quick and accurate way to light a set, and in fact, I will usually have our camera AC set up the camera while a grip and I will load in and set up lighting.
In most cases, by time the camera is set up, we are just about done with the lighting. Trying to light to a monitor is slow and inaccurate. With our industry moving rapidly into the realm of electronic cinema, I find that the trend to adopt a cinema approach to lighting is gradual to non-existent!
Fig. 3 illustrates an interview lighting setup using a diffused key and fill light, with a 2:1 ratio on the subject and a 4:1 ratio on the background. The key light exposure was f-4 as was the hair and shoulder light. In this case I chose to expose the background highlights at between f-2.8 and 4, one half-stop darker than the key while exposing the shadows on the background at f-2, a 2-stop difference from our subject’s key light. Your choice of softness and ratio is strictly a style call. Good luck on your next shoot.
Want to hear more? Tom Musto will present “Lighting for Video Film Style,” at the SBE Chapter 22 Broadcast and Technology Expo, Oct. 8, in Turning Stone, NY.
