'Night' Light Done Right
NEW YORK
In general, the most popular type of question that I get asked is 'can I light with inexpensive gear?' or, a variation thereof, 'do I need all of that Hollywood equipment?'
The answer is yes, and no. Lighting is, without a question, the primary aspect in controlling a photographic image. Manipulation of light is one of the greatest tools that you have to convey mood and emotion through the image. Depending on what you're trying to accomplish, sometimes you need the Hollywood hooplah, but not always.
Recently I was given the challenge of creating a "night" look utilizing natural daylight (day for night) without any augmentation with artificial lighting.
Day for night is generally achieved through gross underexposure. You're rendering your highlights down to below middle gray and plunging your shadows into the abyssal blackness. Day for night works best when the natural light is backlighting the subjects and when you can keep the sky and the ground out of the shot—two things that will give away the cheat very quickly.
Many people use day for night filters from manufacturers like Tiffen, who make two options, the classic blue Cool Day for Night and a much more subtle Day for Night Monochrome that doesn't hit you over the head with James Cameron BLUE, but rather filters it out to give a more "realistic" desaturated night look.
In this case, I elected to not use any filtration. I was also experimenting with day for night on an interior shot. Using the Canon EOS 7D, I set my white balance to Kelvin temperatures and then dialed it all the way down to the basement at 2500K. This puts the camera's white point at a very, very low color temperature and—since, in this instance I was only working with natural afternoon daylight—it rendered that light a deep "moonlight" blue automatically without filters on windows or the camera.
NATURAL LIGHT

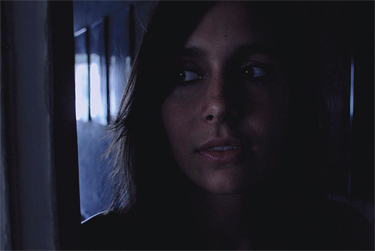
Fig. 1: This day for night look was just a matter of exposure and color balance. For the first shot (Fig. 1), I used no bounces, no augmentation at all, but rather merely utilized the light coming from a window at the end of my hallway as a backlight, raking across the hall wall and the soft light coming from my partially opened kitchen blinds as a key source. The trick here was to not see the window at the end of the hall in the shot, because it would have been too bright and given away the "night" feel. After that, the image was totally controlled through exposure. In this case, I just stopped the camera down to about two and a half stops underexposed on the key side of actress Lauren Solomon's face. If I wanted to maintain shallow depth of field, I could have employed a polarizer (two stops) and ND filters to minimize the light reaching the lens and obtain my underexposure without stopping down.
MIRROR TILES
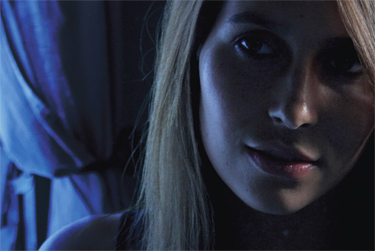
For my second shot, I got a little craftier. I wanted to utilize the natural daylight as blue "moon" light, but I also wanted a little hint of white light on her face. How could I accomplish this using no artificial lighting?
The answer is mirrors.

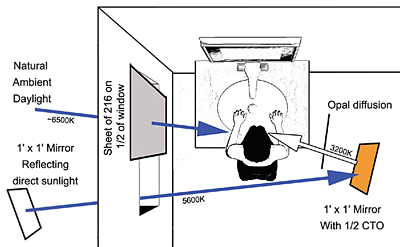
This shot demanded a fairly complex setup, as diagrammed in Fig. 2. Reaching into my bag of tricks, I pulled out two 1-foot x 1-foot square mirrored tiles and mounted one on a C-stand outside the window. I bounced direct sunlight into the window, behind the position where Lauren would be standing (Fig. 1).
Inside, I used another 1-foot x 1-foot mirror, on another C-stand, on Lauren's right side. This bounced the direct sunlight from outside onto the right side of Lauren's face. Now, for this shot, I changed the white balance to "tungsten" 3200K, which still made the natural daylight blue, but allowed me some room to get white light on the right side of her face.
To achieve "white," I placed a sheet of Rosco 1/2 CTO on the surface of the inside mirror to color correct the bouncing direct sunlight to tungsten, which the camera would see as white. In this case, I only used 1/2 CTO because the light would be filtered twice through the same gel. The light coming from the mirror outside would pass through the gel receiving one layer of correction, then it would reflect off of the mirror and pass back through the same gel again—receiving double filtration from one sheet of gel, hence turning 1/2 CTO into full CTO by the nature of it being placed on the surface of the mirror.
The bounced sunlight from the mirror on Lauren's face was way too harsh for my taste, so I hung a piece of Rosco Opal diffusion in the space between the inside mirror and Lauren's face to soften the light quite a bit.

Fig. 2: This mirror tile setup was used when the author wanted to utilize the natural daylight as blue "moon" light. In addition, to reduce the intensity of the natural daylight through the window, I placed a sheet of Rosco Full Diffusion (216) on one-half of the window, nearest Lauren to diffuse and reduce the intensity of the light there, but avoid diffusing the mirror light coming through the window behind her.
That did the trick and the result, again, considerably underexposed to achieve the "night" feel, was accomplished by using only natural daylight, but achieving two different color temperatures from the same light source.
The professional video industry's #1 source for news, trends and product and tech information. Sign up below.
