Computer recovery
The professional video industry's #1 source for news, trends and product and tech information. Sign up below.
You are now subscribed
Your newsletter sign-up was successful
What do you do when you hit the power button on your computer and nothing happens? If you’ve ever been in this situation, whether it’s a company machine or the one sitting at home, you just want it to work again. This article will cover several steps you can take to determine what happened and what you can do about it.
There are two basic scenarios in which this might occur: one is when nothing happens when the power button is hit and the other is when it seems to start up but does not finish.
When nothing happens

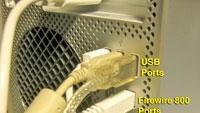
After you have checked the obvious, like the outlet and power cord, when nothing happens after you hit the power button, there are a couple of other steps to take. First, disconnect all USB and FireWire (IEEE 1394) connections to the computer. These ports provide power to the peripherals plugged into them. It’s a good idea to also disconnect any Ethernet connections as well. If a hub has gone bad, it can prevent the computer from powering up. If the computer boots after the USB and FireWire ports are cleared, then you can find the failed equipment and replace it. (See Figure 1.)
But if removing all the USB and FireWire peripherals doesn’t bring the computer back, it’s time to check the power supply. Power supplies are the most common failure point in today’s modern electronic equipment. Many modern computer servers have two removable power supplies, which makes it much easier to keep systems up and running; if one fails, an alarm goes off letting you know. If your station has several computers of the same type, it’s a good idea to have a few spare power supplies on hand. If you have some unique but important computers, you should keep a spare power supply on hand for them as well. This will save great deal of time in finding a replacement if it does fail. (See Figure 2.)
What if the computer powers up but doesn’t complete it’s boot process? We’ll cover that after the basics.
Computer boot basics
The professional video industry's #1 source for news, trends and product and tech information. Sign up below.
As a starting point, it’s a good idea to go over what happens when you hit the computer’s power button. Whether it’s a Windows, Macintosh or Lynx system, they all basically boot the same. Whenever a computer is turned on or reset, it is said to be booting (short for “bootstrap loading), which means that the computer is self-loading the main program that will run it.
As power is applied, the CPU is held in reset until the power stabilizes, at which point the power supply issues a “power good” command that allows the CPU to begin operating. The CPU then starts executing commands from a preprogrammed point in ROM, which is the basic input/output system (BIOS) program, also called firmware.
The memory range of a computer is addressed in hexadecimal, or base 16, counting. The first 640KB of memory range from 0 to 9C400 in hex, and beyond this, up to 1MB (or FFFFFhex), is where the ROM BIOS is stored as well as access to other parts of the computer system, which include video and disk controller card addresses. (See Figure 3.)
BIOS
As the CPU executes the BIOS program, it first runs a series of tests called power-on self-tests (POST). To communicate with the operator, the BIOS first looks for the video card and initializes its BIOS to start the video card and be able to address it. After the video card boots, it displays its own startup screen, which is usually the first thing seen on the computer as it boots.
Then the RAM is tested, and the amount of memory is searched for. If these tests are successful, many systems will usually emit a beep or tone confirming that the memory is good. You may notice that if a large amount of new memory is added to a computer, it takes longer to complete its boot process because there is more memory to test. Some systems will transfer the BIOS from ROM to RAM at this point, making the execution of the BIOS program quicker.
Next, the BIOS program tests other parts of the system including the mother board jumpers and DIP switches, which establish the configuration of the computer. It also examines the CMOS RAM memory where user settings for the BIOS are stored.
The CMOS memory is used to store configurations for peripherals, diskettes, video cards, the boot-up sequence as well as passwords. In earlier DOS systems, the CMOS memory stored the type of hard disk with the number of cylinders and heads; now, that is taken care of by the disk controller.
The system then searches for what devices are part of the computer system, such as the USB, FireWire, serial and parallel ports the keyboard and mouse. It will also seek out and configure any plug-and-play devices it finds and display the results on the screen.
Because the video card has booted and is accessible to the BIOS, the video screen can be used to display information about the boot process. As the BIOS tests are carried out, the results are shown on the screen confirming whether the tests have been passed. Macintosh computers, because of their closer integration between the firmware and hardware, do not display such information on the screen but show a smiling icon if all tests are passed and a sad icon with an error code if they are not.
Because there is no way to display any system errors on the video screen before the video card is initialized by the BIOS, the computer will issue a series of beeps on PCs. There are beep codes for each of the different BIOS programs that allow you to understand what they mean. On Macintosh computers, there may be a flashing power light or other icons on the screen letting you know the boot process did not succeed.
As the system tests and displays the information above, it also allows the boot process to be interrupted and the BIOS settings to be changed. Sometimes it’s hard to see because the information may flash on and off the screen very quickly, but pressing the delete key will usually enter the BIOS setup page.
On Macintosh computers, you can enter a safe boot mode by holding down the shift key after powering up. To watch the boot process, hold down the shift + command + V keys instead of just shift. Until the OS is successively operating, the small BIOS program is running all operations of the computer. (See Figure 4.)
The last thing the BIOS does is load the OS, which involves searching for the master boot record on the hard disk and following the instructions there. Some hard disks can have more than one OS on them; in those cases, the operator is given a choice on the screen of which OS to boot with.
Next Time
The next “Transition to Digital” tutorial will cover what to do when the operating system isn’t loading.
