The implementation of fiber optics is a dark art. At least, that’s the way it seemed a few years ago. People sat in front of polishing equipment making endless figure eights as if they were highly accomplished tai chi masters deep in meditation. Making a good fiber connector involved epoxy, heaters for curing, microscopes, and not an inconsiderable amount of magic incantations.
Fortunately, much of the difficulty associated with fiber implementation is in the past. New connectors have been developed, installation methods have been simplified, and overall, it is a much simpler world.
Building your first fiber network, whether for broadcast or computer applications, can be a bit daunting. But following a few simple guidelines can help transform the task into an enjoyable learning experience.
If you are a product engineer, there are a number of choices you need to make regarding fiber diameter, mode, laser frequency and so on. The standard for several years has been 62.5 micron cable used at 850 nm. New developments are pushing the cable diameter down to 50 micron, and pushing the frequency up to 1550 nm. These changes allow a designer to get longer lengths and more data down a given fiber path.
There are major differences between multi-fiber cable optimized for outdoor use and cable designed for indoor distribution. Of course, there are also cables for inter-city and longer applications, but the broadcaster typically does not install and maintain these sorts of fiber optic networks.
A single-fiber cable suitable for indoor use contains a single fiber strand with a tight buffer surrounding it. The result is a robust cable that can be terminated directly without any special considerations. A broadcaster may choose to employ this cable as a jumper between a desktop graphics system and a wall plate. These cables can also be obtained in “Siamese” zip-cord pairs.
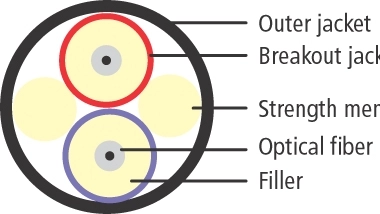
Figure 1. Belden multi-fiber, indoor-use cable
Figure 1 illustrates a multi-fiber, indoor-use cable. This design contains two or more tight buffer cables surrounded by a common outer jacket. An important difference between this cable and a cable intended for outdoor use is that the outer jacket can be stripped away to reveal two fiber cables that are ready to be terminated. A cable such as this one may be larger in a multi-fiber configuration than its outdoor counterpart, but it will not require a breakout kit for termination. (More on breakout kits later.)
Figure 2. Belden multi-fiber, outdoor-use cable
Figure 2 shows the cross section of a cable designed for outdoor use. There are several significant differences between this cable and the one in shown Figure 2, above. First, the outdoor cable contains a number of fibers separated by a loose buffer tube. This tube slides over the fibers, lubricated by a gel. Several fibers are contained in each buffer tube. Second, the individual fiber strands are not surrounded by a protective jacket. This saves space in the cable, but requires a breakout kit to terminate the cable. Third, the jacket on the outdoor cable is much thicker than that used on indoor cable, and is treated to resist water and ultraviolet radiation.
Usually when going from outdoors to indoors, a transition of some sort is required. This involves breaking out the individual fiber strands from the loose buffer tube and connecting them to a panel. The other side of the panel is connected using indoor cable. Figure 3 shows a typical breakout kit. The kit converts the loose-buffer-tube, multi-fiber cable to a number of tight-buffer-tube, single-fiber cables that can be terminated with the appropriate connector. The tight-buffer cables are much more rugged and will withstand the environment of a broadcast facility much better than the individual strands of a loose-tube cable.
If you are concerned about terminating fiber cables yourself, don’t worry. It’s much easier than it used to be. Companies such as 3M, Siecor and others now make crimp connectors and splices for fiber that allow you to terminate or fiber easily and inexpensively. If you were not all that great at making splices in the past, you can probably do better with these. Signal loss ranges from one-half to one dB per connector. A connector kit costs about $350, and connectors are about $6.00 each.
Gone are the days of the old bi-conic fiber connectors, when alignment was a real problem. The new FC connectors always mate correctly with very little effort. With a little practice, you should be able to terminate a fiber in under a minute.
Figure 3. Fiber-optic breakout kit
You should also be aware that there are hybrid fiber connectors for outdoor use that allow the broadcaster to run both fiber and conventional wire cable in a single cable. There is also a four-fiber connector made specifically for broadcast applications. Many of these connectors are ruggedized and waterproof, so they are very well suited for a mobile truck environment.
If you have ever taken a tour of a large fiber installation, probably one of the first things you noticed was the large number of ducts running all over the building. Fiber-optic ducts are specially designed to carry fiber-optic cables and protect them from damage. They have carefully designed curves and openings that protect the cable from stress and excessive bending that could degrade the performance of the cable or possibly break it. Your decision to use ducting will be based on the amount of fiber you are installing, and whether the fiber is concentrated in a central area. In any case, be sure your installation avoids bending the fibers beyond their rated radius. Even if you do not break the cable, you may increase loses significantly if you exceed manufacturers’ specifications.
Fiber for office networks
What about fiber’s place on the desktop in the television environment? It is true that fiber connectivity will give you the greatest potential for speed, but, so far, it is primarily used behind the scenes. Here’s why. First, it costs about $200 per line for fiber line, terminations, wall plates, and jumpers. A fiber hub will cost anywhere between $1,000 and $3,000 depending on the features you need. Fiber NIC cards are also more expensive – a six-pack of FX fiber NIC cards will cost about $1,000. Second, fiber media can be damaged easily. The cables are better than they used to be, but it is difficult to protect a fiber cable in an office environment. The big killer of fiber cables is not crushing, it is bending the fiber too tightly. Third, fiber terminations are sensitive to dirt. If you leave a fiber termination uncovered, and reconnect the cables before you clean both surfaces, you may end up with a connection that is noisy at best. Fourth, gigabit Ethernet is now a commodity item, and multi-gigabit, wire-based technology is on the horizon. Fiber may provide very high bandwidth, but with these four issues, you are more likely to find fiber used to connect components behind the scenes, with wire being used from the switch to the desktop.
However, fiber has a big advantage over wire in areas of high electromagnetic interference, impulse noise, and lightning. If you continually have a problem with lightening destroying the NIC card at the end of a long run of 10BaseT cable, you might try switching to fiber. Another advantage is distance. Fiber can be used in runs up to 412 meters, where 10BaseT and 100BaseT are limited to 100 meters.
Brad Gilmer is executive director of the AAF Association and president of Gilmer & Associates, a broadcast consulting firm.
Send questions and comments to: brad_gilmer@intertec.com
