3D on a Budget

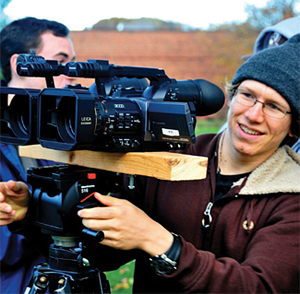
The author's 3D camera setup
CENTER VALLEY, PA.—As a TV/film professor at DeSales University, I try to keep on the cutting edge of technology. Since 3D is the hot trend right now, I thought it would be fun to get our entire department to work on a 3D movie to premiere at our film festival in March. 3D movies seem to center around things flying off the screen at the viewer. Why not create a story that accentuates that?
Not being able to get Panasonic's new 3D camera, we did the next best thing—shot in 2D and created the third dimension of depth in post. Having our entire film department work together on the 3D project resulted in a learning experience that would streamline the process for future endeavors.
We decided to follow the old process of using glasses with a green (or cyan) left lens and a red right. Using two Panasonic DVX100B cameras mounted side by side on a wooden two by four, we believed we could simulate what both human eyes could see. We intended in post to put the left eye on channel one and the right on channel two and edit accordingly. However, we should have realized that two cameras of this girth are too wide when placed together. Human eyes are roughly three inches apart and these cameras were more than six with the lens shade. Therefore, if shooting with two cameras placed together, the lenses should be much closer together like our eyes. Shooting everything with this camera setup was not a problem; we were able to correct it in post by using footage from just one of the cameras.

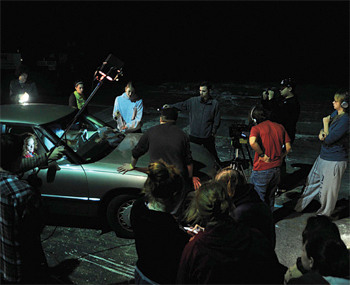
A group of students gather around the "set car" to simulate driving it on the road. Working with two cameras poses another problem in that the settings on both cameras should mirror each other—same shutter speed, f-stop, lens setting, etc. Any deviation will result in one eye's image not quite jiving with the other.
COMING ATCHA!
When shooting in 3D, people love to see things coming out at them. Our script was written accordingly in that a young film major cannot be alone with his date without having an entire crew capture the event on video. Wanting a variety of day and night scenes, we had boom poles reaching out from the screen, jib shots that began in the leaves and ended on your lap, a Glidecam walking off the screen, and anything else that would increase the "depth" effect. Shooting objects seemingly leaving the screen only involved the protruding object getting as close to our cameras as possible.
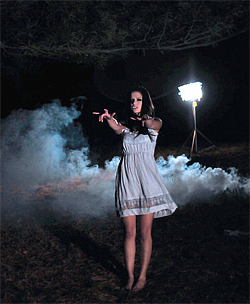
In one night scene, an ex-girlfriend dressed all in white is reaching out to the viewer. Smoke is rolling by in the background and thunder claps briefly illuminate the dead trees in the background.
FIXING IT IN POST
The student editor on this project, Katie Wallace, edited the footage to best tell the story. Julian Guindon, our sophomore Mac expert, researched and found the perfect solution. Using Apple's Final Cut Pro 7, he selected the Channel Offset from the pull down menu and changed the Red Channel to negative fifteen degrees (-15°) which moves the reds to the left. Once applied to the footage, you noticed a distinct cyan and red ghosting of the image. Donning the 3D glasses, your eyes marry the two colors and you see a "3D" image on the screen.

Cat extends her "3D" arms as a fan blows her hair and fog rolls by in the background. The number "minus 15" is not an arbitrary setting. In our tests, minus fifteen degrees works best (separation of colors when wearing the glasses) for wider shots when the objects on the screen are farther apart and minus seventeen degrees when seeing things in close-up because of the telephoto's compression. The slight shift is evident in the wide shots and more of a shift is needed when closer.
If the offset is too great, you actually will see the colors surrounding the object in the frame; and if the offset is not enough, the 3D effect is diminished.
LESSONS LEARNED
Having completed the project, our goal is to have it screened in 3D at the festival in March. This means purchasing hundreds of 3D glasses so each viewer can experience the "effect" of 3D for themselves.
What makes 3D work best is experiencing things in different planes. Having objects coming at the viewer; a frame that's filled with many layers of objects; and exposing everything properly all make the 3D experience that much better. Some people, even when wearing 3D glasses, do not have the depth perception to experience the end product in the correct fashion.
In summation, this was a great learning experience for everyone involved. With 3D being the hot ticket now, it is relatively easy to create your own 3D environment with a little pre-planning, some diligence in post, and having enough 3D glasses for everyone to experience the magic.
Chuck Gloman is an Associate Professor and Chair of the TV/Film Department at DeSales University. He may be reached chuck.gloman@desales.edu.
The professional video industry's #1 source for news, trends and product and tech information. Sign up below.
Chuck Gloman is Associate Professor with the TV/Film Department at DeSales University.

