Harris Selenio Media Convergence Platform

The Harris Broadcast Selenio
So much has changed in the broadcast industry during the past few years, including the reliability of equipment and the size of maintenance staffs. This has meant (for me, anyway) that much of the stress has finally disappeared from repairing, acquisition, and distribution perspectives. Many products can now perform multiple functions, providing an exponential increase in value. Manufacturers are pushing the “one box” solution to the extreme. It should be no surprise that Harris Broadcast is right there on target with the Selenio Media Convergence Platform.
FEATURES
The Selenio could perhaps best be described as a card chassis that’s been to the gym. What separates it from similar units is the large selection of modular options. Physically, the unit occupies 3RU, is about 21 inches deep, and can hold as many as 14 single modules. Power consumption (depending on card population) varies from 90 Watts to about 650 Watts.
Standard on the Selenio frame is a network interface, two genlock reference loops, a built-in browser-based management system, two GPIs, two GPOs, and a power supply. Options include a backup power supply, second controller, and local control panel.
Available modules include encoder/ decoders, transport stream muxes/demuxes, video converters, and frame syncs. Accepted formats include SD, HD, 3G, 3D, and delivery platforms include broadcast, broadcast mobile, mobile stream, and the Internet. It accepts black burst, tri-level sync, and DARS (digital audio reference signal).
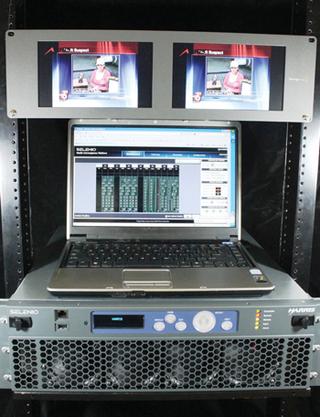
The front of the unit has large, easy to grab release latches on each side of the fold-down front panel. The front panel has large honeycomb-shaped openings that provide very little restriction for the four internal cooling fans. When the front panel is dropped, card/slot connectors on each side disconnect fan power and control surfaces from the chassis. The card guide-rails are well machined and card seating is sure and positive. With the front panel closed, there’s access to a USB and RJ-45 port. Status LEDs visible include: Controller, System, Module, Input, and Alarm. For user display, there’s a three-line LED display for standard menu items, including: Alarm, Config, Status, and Util.
IN USE
The Selenio was shipped with 11 modules, including an up/down/cross converter with audio processing. I could write about each module, but as space is limited here, I’ll just highlight the crossconvertor module, (SEL 2XD-1) as it’s the one I was drawn to, just like a moth to a candle.
For testing, I placed the Selenio on a rackmount shelf, with my laptop sitting on top, and mounted a monitor set at the top of the test rig. After firing up the gear, all that was left was getting a signal into the unit and gaining IP control.
With the supplied IP address, I configured my old laptop to be in the range required to connect with the Selenio, and using a “crossover” cable, I was able to get right in to the GUI using IE, as there was no user or password required (for the demo gear).
The first screen to come up was the “ dashboard ,” which shows a picture of the backplane and identifies each module installed. It also provides “connectivity labels” on all BNC’s and GPI/O’s. Using the image for the XD card (along with what was actually printed on the card), I was able to establish video I/O connectivity through the XD module in no time at all, and could follow my signal through the up/down/cross converter.
Now that I could see the signal, it was time to play a bit. One of the things that’s been getting my attention lately is aspect ratio conversion, so I figured that this was a good place to start. However, it did take me a few minutes to find my way around the GUI. On the screen, in addition to the “Dashboard” tab, there’s a “Fault Log” tab, “Streaming” tab, “Configuration” tab, and “Administrator” tab.
When I clicked on the “Configuration” tab, a list of modules appeared on the left side of the screen. When I clicked on the “Slot 01-XD” button, a block diagram of the XD module popped up, appearing much as it would in an equipment manual.
After clicking around the other tabs, if finally dawned on me to just click on the part of the block diagram that related to the function I wanted to accomplish. When I tried this on the “Conversion and Advanced Video Processing” block, a dropdown menu appeared on the screen with 13 choices for aspect ratio control, including a separate dropdown for AFD “crop.” This is a pretty slick way to gain control— instead of a traditional and complex menu tree, you just click on the part of the module that you wish to use. It’s very intuitive and progressive.

In using the menu choices, I was able to manipulate the output of the XD card at will, trying all “flavors” of ARC. The XD card also had all of the standard audio options, including channel shuffling, level adjust, and more.
SUMMARY
I should note that in evaluating new products I prefer to “bounce” around on my own instead of being led by the hand. I don’t know if that’s gender related, or just my character.
However, I do believe my method allows me to evaluate equipment as most people would use it. If I hit no snags with this technique, then I know that the manufacturer has a “winner.” With the Selenio, I had no hang-ups at all. I don’t really believe that Harris could have done a better job. In short, the Selenio really is a solid broadcast product.
Joey Gill is chief engineer at WPSD-TV in Paducah, Ky. and has been with the station for 30 years. He has worked in television since 1977. He may be contacted atrespond2jgill@yahoo.com
Get the TV Tech Newsletter
The professional video industry's #1 source for news, trends and product and tech information. Sign up below.
